
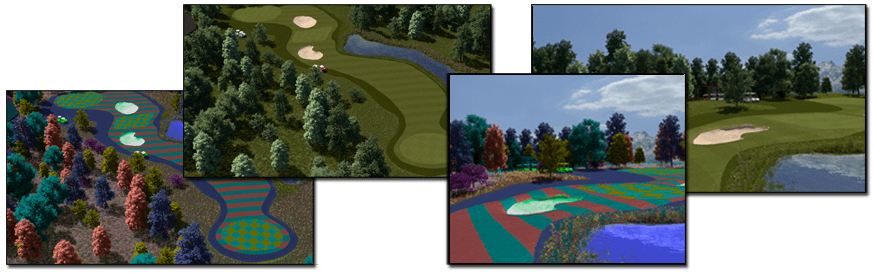
Produced with the intention to incorporate a high density of vegetation, the “Golfplatz”-project was our training ground to gain some first-hand experiences with the creation and rendering of very large scenes.
The environment of a golf course seemed to be a very reasonable choice for an undertaking like this, because it incorporates a lot of different kinds of plants and foliage like the very short trimmed grass on the playing surface – the green – medium-sized plants like the rough grass and the flowers, that surround both green and lake as well as large objects with a high number of small details, like the trees with foliage made from individual leaves. We tried to recreate as many of them as possible with real, individual objects instead of textures and each type had its own unique characteristics and problems.
Right from the start we knew, that we were to create more vegetation then we could possibly render in one single pass on our machines with 16 GByte of RAM. We wanted to experiment with methods to split up a heavy scene into smaller, better manageable chunks and at the same time explore opportunities that give us the ability to change things like color, reflections and lighting without the need to re-render everything. Finding ways to handle those kinds of problems was our main motivation to do a project like this, because we wanted to experience the pros and cons of possible solutions by ourself to have this kind of knowledge ready whenever there is a customer project with similar problems.
The overview demonstrates our approach on how to split the vegetation into separate passes with the functionalities of VRay and RP Manager and how it is possible to combine the different layers to one picture in Eyeon Fusion.

Mit dem Laden des Videos akzeptieren Sie die Datenschutzerklärung von Vimeo.
Mehr erfahren
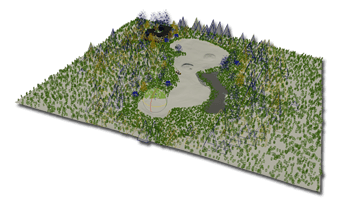
When planning and creating this scene, we wanted to be able to place and move the camera throughout the whole scene. So we couldn´t simply break up the whole scene according to one, final angle with fore-, middle- and background. With this premise in mind, we tried to create a vegetation that looks and feels realistic in almost every part of the scenery. As a result of that, the scene became very heavy and it was impossible to render one single image with all the final elements active in one pass. This chapter shows how we decided to make different kinds of vegetation and how we split them into single, renderable chunks.
There might arise the question if it is really necessary to create scenes like this with large numbers of unique objects to achieve believable and good looking natural environment scenes.
Of course it is not 🙂
But we wanted to have a high rate of variation in the vegetation while still having as much control over color in the compositing stage as possible. This project was intended to be more of an experiment to explore the boundaries of the technically manageable rather then creating the most streamlined and efficient outdoor shot ever. That´s why we decided to set every object for scattering to another Object ID and render them out in masks.
The next picture illustrates the different options for the coloring in compositing. The trees, for example, consist of six different variations.
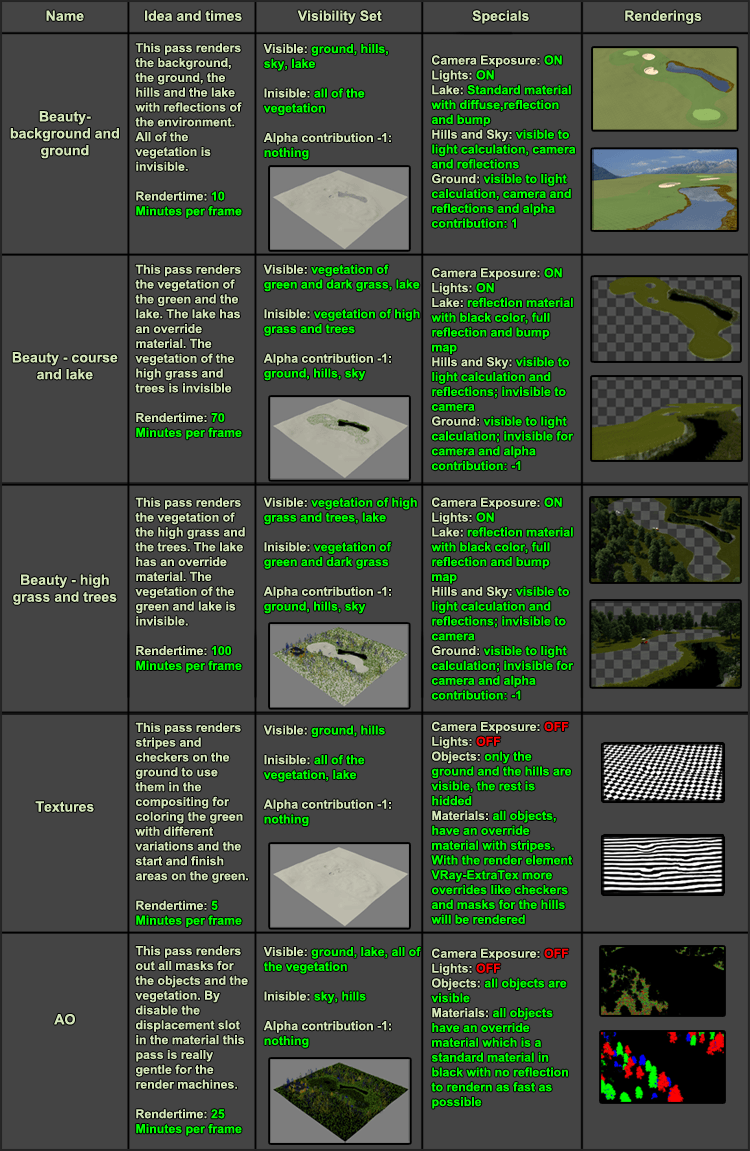
As mentioned already, rendering all of the vegetation in one pass was too much for our machines. Because of that, we split the scene into three passes by utilizing the visibility sets of RP Manager. We were able to render every resulting pass without any troubles on our 16 GByte Render workstations. Listed below are the three Visibility sets we created:
Through hiding and unhiding areas of vegetation with the visibility sets of RP Manager it was possible to render the whole vegetation of the scene in three passes to merge them later in the compositing. The first pass only took up less than 2 GByte of main memory, whereas the second and the third pass required up to 14 GByte of RAM each.
After creating the three beauty passes, we decided to create additional passes to attain more control when compositing the whole scene later. This chapter shows how we created the passes to color line and checkerboard patterns on the green and why we needed one pass that contained all objects after all. It is also explained, what we did, to be able to render this one.
Furthermore, we go into details on why and how we split the beauty passes for the rendering of the animation into calculations for light and the actual beauty rendering.
We created five passes that we put to construct the final images of the golf course. Three passes where necessary as beauty renderings while the two remaining ones were special passes for specific effects (Golf_Pictures_AO and _Textures). All of them have different visibility sets and individual settings for camera, lights and some objects (like the ground, lake and sky). Those special properties for each pass were set through RP Manager, which made it possible to change them at every time in production.

RP Manager is a great plug-in for 3ds Max, which allows you to control the properties of a scene and its objects individually for every single pass. Each pass works and behaves like a single 3ds Max scene, but all of them are kept one file. That allows the user to change properties, like the count of the scattered objects, and have them propagated through all the passes, which rely on that properties.
The following chart gives an overview about the passes and their differences in respect to each other. The given rendering times are average times for the animation frames. They need so much time, because we wanted to have flicker free results. The frames of the pictures require much less time than the frames for the animations because we can ignore anti-aliasing-caused flickering for those.
The alpha contribution of “-1″ in the visibility set column means that the objects are not visible for the camera and get incorporated as completely black into the resulting alpha channel.
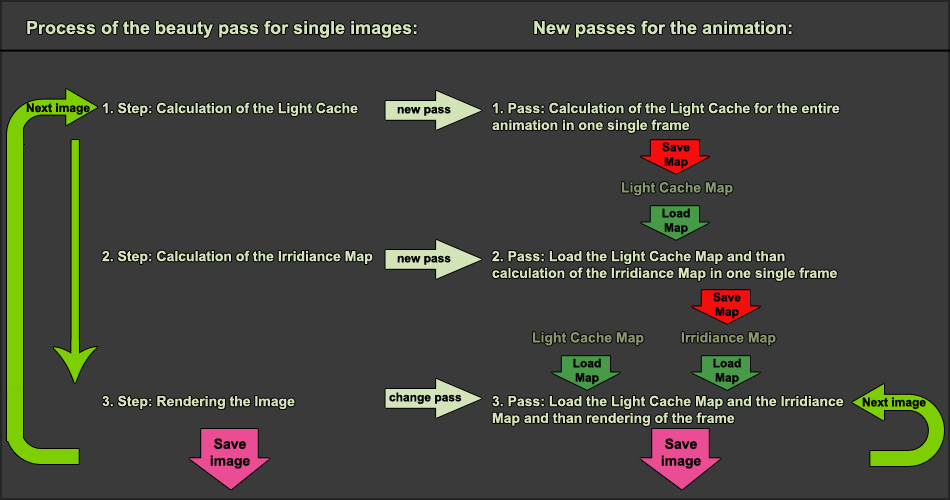
For the single pictures of the golf course we calculate the light (by Light cache and Irridiance Map) and render out the pictures in one step. For the animation this approach would take way too much time and to calculate the light for every single frame would also cause flickering in the final results. That´s why we decided to split the calculation of the light from the rendering. So in addition to each of the three beauty passes, two new passes were created; the Light cache pass and the Irridiance Map pass.

The next picture illustrates the rendering-process of a single image and how we created the new passes for the animation. The first step of a rendering is the calculation of the Light cache. For the animation we created a new pass, which only calculates the light cache for the entire animation. By checking the option Use Camera Path in the Light cache rollout, it is possible to only render the first frame of the active time segment and 3ds Max will incorporate the animation path of the camera during the calculations. After the computation is done, the resulting map gets saved to a file.
The next pass is for the calculation of the Irridiance map. In the preprocessing of this pass, the saved map of the Light cache will be loaded and then the Irridiance Map will be computed. This also happens in a single frame with the checked option Use Camera Path in the Irridiance Map rollout. Similar to the Light cache pass, only the first frame of the active time segment has to be rendered. After the calculation the map will be saved to a file, too.
In the last pass the Light Cache will be loaded as the secondary bounce and the Irridiance Map will be loaded as the primary bounce of the indirect illumination. After doing so, the frame can be rendered without the need to recalculate the indirect lighting in the scene.
Working this way makes it very easy to get flicker free animation, if only the camera is moving and not the individual objects.
The vegetation has been split and the passes were rendered. So it was time, to merge all passes together to one picture. This chapter gives an overview on our problems during this process, for example the alpha-channel problem while working with masks on thin objects in the scene and how we got the reflection of the trees on the lake.
If you are working on scene that contains many objects that intersect or occlude each other, making changes to them in the compositing stage with the use of masks can result in the occurrence of visible borders around the areas, where the objects get in contact with each other. Those edges are the result of the not fully black or white pixels in the border areas of the objects in the corresponding mask. Those border-problems can arise when there are different anti aliasing results for the beauty shot and the mask renderings. Those distinctions can occur when using a contrast-based image-sampler like it is done in most modern rendering engines. It is also a problem, whenever there are objects of different colors, that are on top of each other in one single image. The color of both objects gets calculated into a final result incorporating the contrast between both areas and the applied image filter. The result can be non-congruent to the corresponding mask and by that you will gain visible borders around the object when changing things like color or brightness of it.
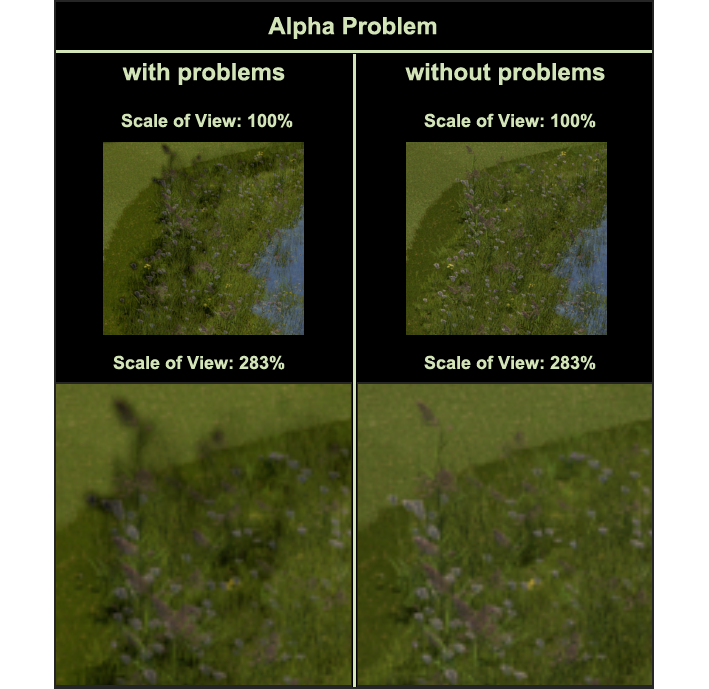
We decided to color the objects in the passes of the vegetation by their masks that where rendered as elements together with the AO pass and then merge them together. So all edges, which may appear during the color correction, will be cut away by the alpha-masked merge.
For that approach, it was necessary that the ground is not rendered in the same pass as the vegetation – which would in our case be the passes two and three. However, the ground is necessary for the calculation of the light and rendering of the shadow on the vegetation, so we had to find a solution for this.
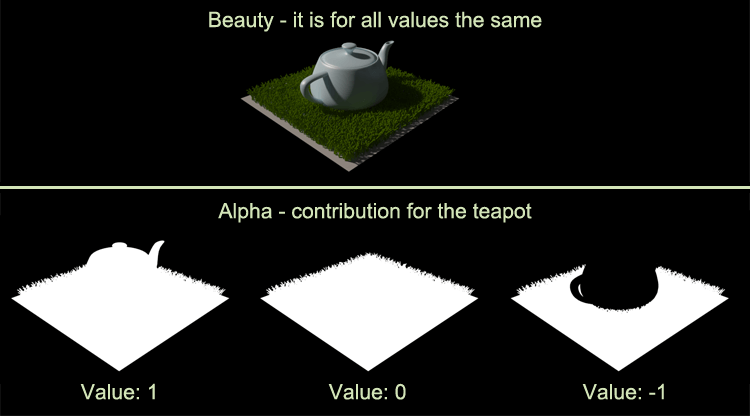
The good news is that VRay has a great option for this -> The Alpha contribution of the Matte Properties, which exists for every object and can be set for every single pass with the RP Manager. This option gives the user control over how the object appears in the alpha channel:
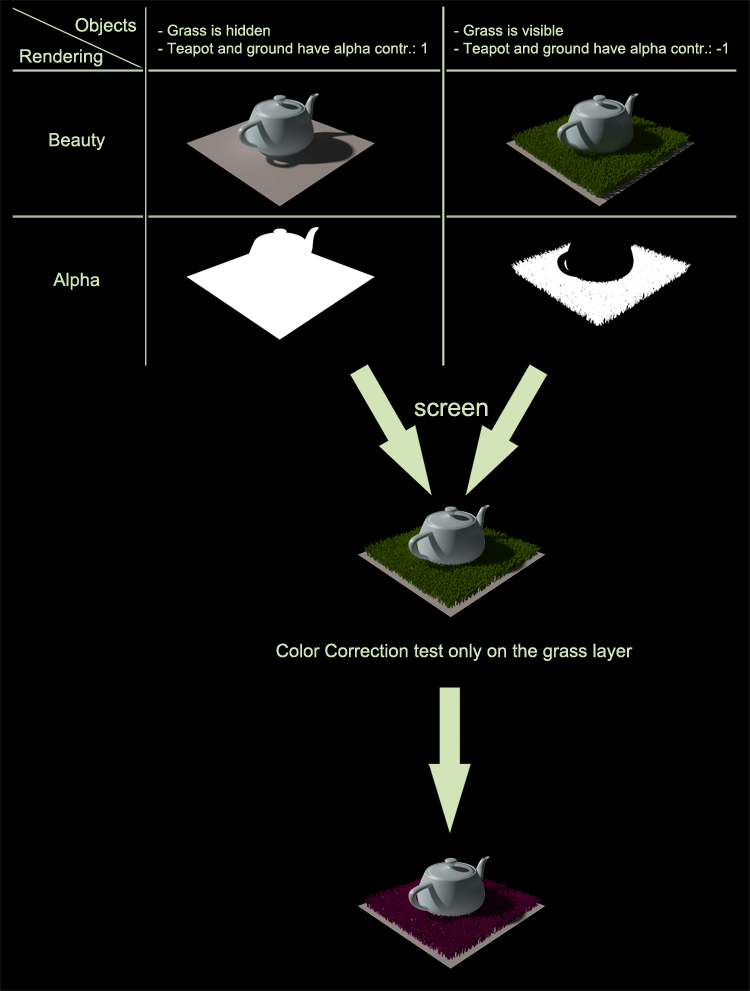
The next picture shows a small scene with a ground, a teapot and some grass, which is created by a Multiscatter. The result of the beauty rendering is always the same, but the alpha changes in dependence to the value of the alpha contribution of the teapot.
The next picture illustrates, how we worked with our passes. The first pass just renders the ground and objects without any vegetation. The second pass (one of our vegetation passes) renders those objects as well but also includes the vegetation. The alpha contribution for the ground and the objects was set to -1. Thanks to this, the ground and the objects are in the calculation of the light and in the rendering, but they will not be saved in the alpha.
Working this way makes is very easy to color the pass of the vegetation and just merge it with the alpha mask over the ground-pass, than there aren´t any edges of the coloring on neither the objects nor the grass.
Just as a short notice – the following picture is just meant as an example on how to separate a grass-layer from a scene. We are aware, that there are some errors in this picture like the missing shadow from the grass on the ground plane or the still noticeable color effect at the bottom of the teapot. Removing them is pretty easy but we didn´t take care of that, as it does not really help the main purpose of that images.
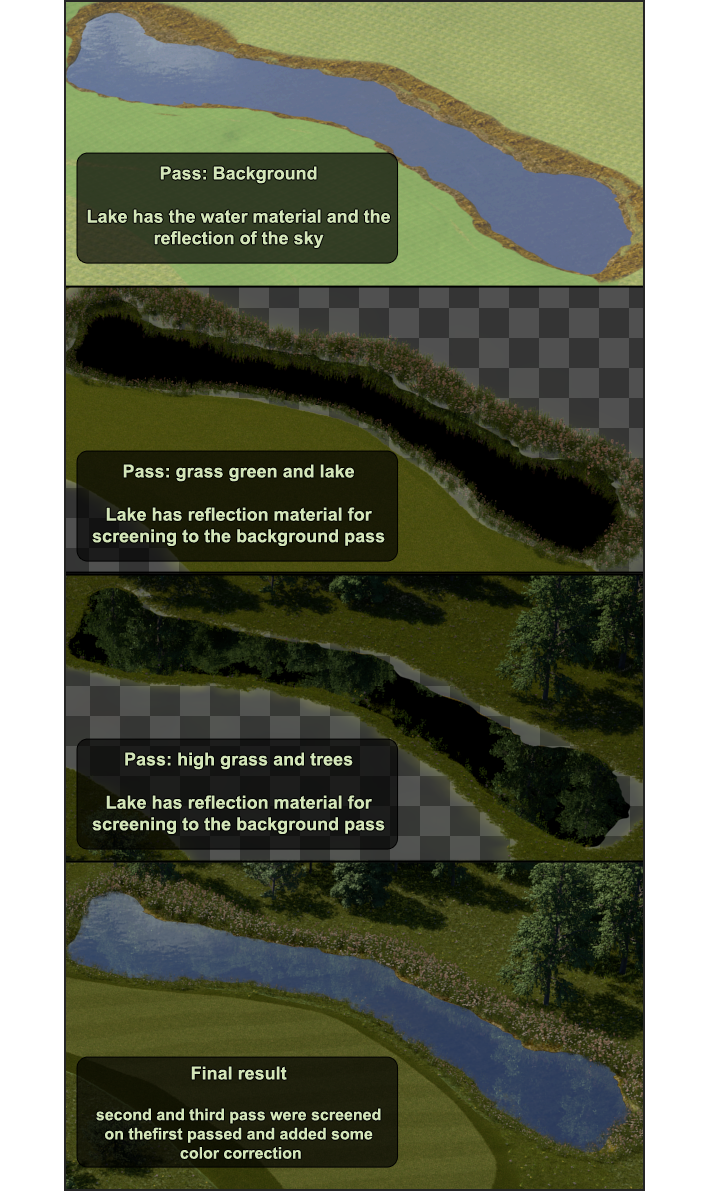
We decided to go for a very easy and straight-forward approach to get all reflections of the vegetation and environment of all passes onto the lake.
In the first pass, the one for the background and ground, the water surface has a lake-water material with color, bump map, reflection and so on.
In the second and third pass (the first one for green and lake grass, the second one for high grass and trees) the lake has an override material, which can be easily set by using the RP Manager. It is a standard material, which has a black color, 100% reflection and also the same bump map like the original material.
So in the compositing, it is possible to screen the reflection of the grass and trees of the second and third pass onto the lake of the first pass by using the lake-area-mask from the AO pass. One more advantage is that you can control the intensity and color of these reflections.
In the next picture you can see the different passes with the different materials for the lake. Another thing you can notice is, that the ground wasn´t rendered in the second and third pass, but by giving a value of -1 to the alpha contribution, the lake will be cut at the edges of the ground and the lake.
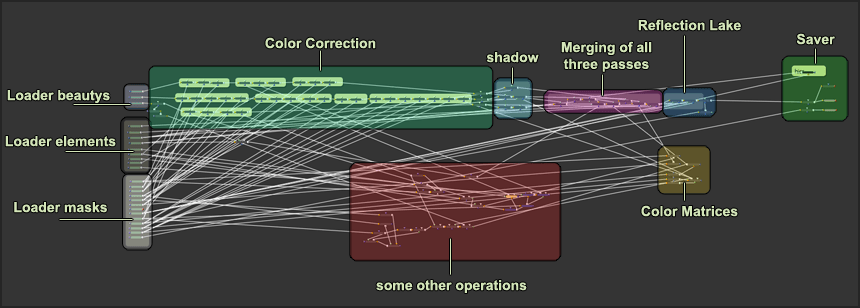
For the compositing of the golf course we used Eyeon Fusion. The next picture gives an overview of the final node-tree. You have to read the tree from left to right. First we tried out to color the objects by their masks after merging the passes together, but then we noticed the alpha problems and looked for another solution to get it all together.
Our approach was to color the objects directly after loading the passes. Then we overlaid the shadows of the objects from the different passes onto them (for example the shadow of the trees onto the grass of the green) and only then then we merge all passes together under the influence of the alpha masks of the beauty passes. By working that way we solved the problem with the edges.
The last step before saving the final images, was to screen in the reflection of the trees and the grass onto the lake surface. The rectangle with the name “color matrices” just converts the masks from their RGB-values to a black-and-white mask. This is necessary when you want to merge them together with other masks.
The saver part consists of two savers, one for the beauty and one for the Zdepth, and one gamut operator, which shows the picture in sRGB Color Space for previewing purposes. The beauty is saved as a linear image, so we are able to properly work on it in after effects for some more effects like lens flares, Depth of Field and desaturation of objects, which are far away from the camera.
This is the end of the overview for the golf course and we hope it was fun for you, to read and maybe take some hints and tricks with you. To see more of our projects, visit our Showroom.
Tags
Published on 20 October, 2015